You can create a new user or edit the details of an existing user in Pyramid from the Users page of the Admin Console.
This topic describes how to create and edit individual users manually. If you need to create users through the Search facility (because of the settings of your authentication provider) you should follow the steps in Adding Users through Search.
Tip: If you are adding a large number of users, you might want to consider the bulk import process instead. For more details, see Importing Users using the Admin Console.
Note: The settings that you need to provide depend on the authentication provider that you are using and whether you are creating a new user or editing an existing user. For details of the editing process, see Editing existing users (below).
User Management
Adding a User
You can add users using the Admin Console:
- In the left-hand menu, select Access > Users.
- From the buttons at the top-right of the page, select the "add" option you require:
The Users page opens, showing the current User List in the main body of the page.
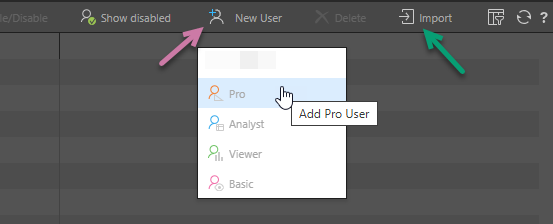
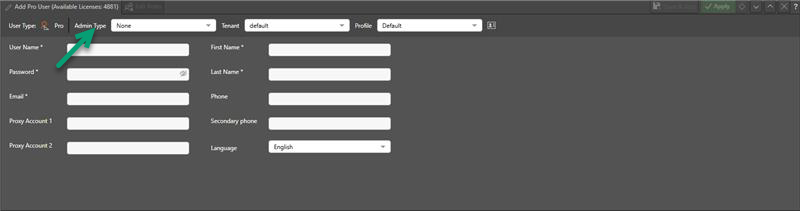
The Add <User Type> User panel opens at the bottom of the page, where you can select the User Details for your new user.
Note: If you see a Search form in place of the preceding Add Users panel, that is because your authentication provider is Active Directory, Azure Active Directory, Open LDAP, or SAML or OpenID where Provider Provisioning Settings are configured on setup. Where this is the case, you need to follow the process described in Adding Users through Search.
Save
Save the user in the system:
- Click Apply to save the user and view their details.
- Click Save & Add to add the user to the system and clear this panel ready to add another user.
Editing a User
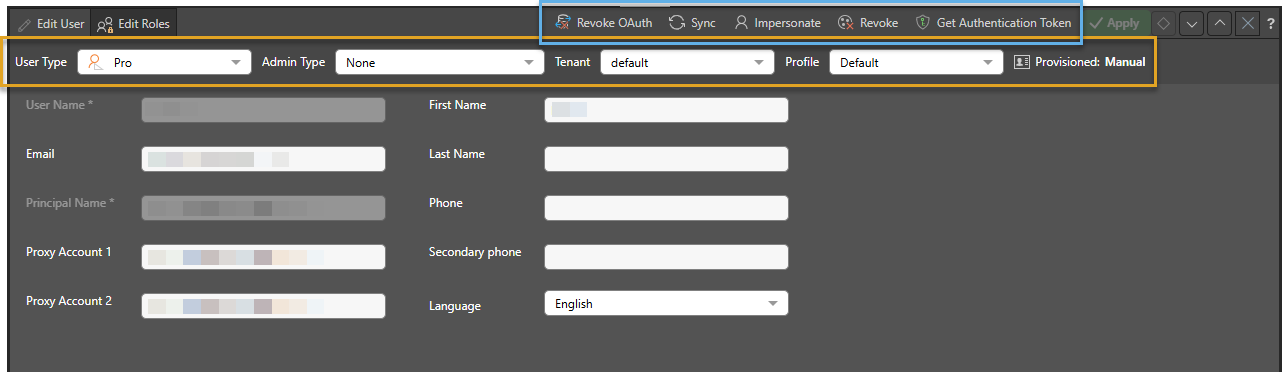
To edit an existing user, click on the user in the Users list at the top of the page. The Edit User panel opens at the bottom of the page:
Editing Roles
After you have created your new user, or when you are editing an existing user, you can click the Edit Roles tab (purple arrow) to configure the roles associated with this user.

The unassigned roles (created manually or using an import) are shown in the left-hand panel:
- To assign one specific role, click its Blue Plus symbol (orange arrow).
- To assign multiple roles, use the checkboxes to select the roles you want to assign (green arrow) and then click the right-pointing arrow (yellow arrow) to assign all of the selected roles.
Tip: You can "unassign" roles in the right-hand panel using the Minus symbol or checkboxes and left-pointing arrow.
User Details
The following tables show the individual user details captured when creating new users individually (not using search) or when changing for existing users.
Note: You cannot edit a user's main details in this page if that user is Fully provisioned. See below.
Common Fields
These fields are positioned horizontally at the top of the Add User or Edit User panel. See the orange highlight above.
|
Field Name |
Create |
Edit |
Description |
|---|---|---|---|
|
User Type |
No |
Yes |
Change the user type for the selected user. You can select one of Pro, Analyst, Viewer, or Basic as needed. For more information, see User Types and Roles. |
|
Admin Type |
Yes |
Yes |
Pro only. You can select one of Enterprise Admin, Domain Admin, or None as needed. Enterprise Admins have admin access across the entire system and its settings, while Domain Admins have admin access to the specific parts of the Admin Console (Access Rights) at their tenant. For more information, see Admin Rights. |
|
Tenant |
Yes |
Yes |
The tenant that the user or users should be a member of. For more information, see Tenant Management. |
|
Profile |
Yes |
Yes |
The profile that should dictate this user's "experience" (Note: Profiles are not relevant to administrators or Basic users.) For more information, see Profiles. |
|
No |
Yes |
Indicates whether this user is managed using provisioning and to what extent you can manage their details in the User view. Can be one of Fully, Differential, or Manual. See below for more details about provisioned users. Provisioned users can only be sourced from authentication providers that sort user provisioning. |
Main Fields
|
Field Name |
Create |
Edit |
Description |
|---|---|---|---|
|
User Name |
Yes |
Read-only |
The user's username. Display name, might appear in logs and so on. Required. |
|
Password |
Yes |
Yes |
The user's password. Required for DB. |
|
|
Yes |
Yes |
The user's email address. Required. |
|
Principal Name |
NA |
Read-only |
The user's principal name in the LDAP system. |
|
First Name |
Yes |
Yes |
The user's first name. Required. |
|
Last Name |
Yes |
Yes |
The user's last name. Required. |
|
External ID |
Yes |
Read-only |
The SAML or Open ID login ID for the user. |
|
Phone |
Yes |
Yes |
The user's phone number. A valid phone number includes an international prefix. Optional. |
Secondary fields
The secondary fields have Pyramid-specific values and do not get overwritten by the provisioning process when a provisioning job is run, or when the user is synced:
|
Field Name |
Create |
Edit |
Description |
|---|---|---|---|
|
Secondary Phone |
Yes |
Yes |
Another phone number. Any phone number should be formatted with its international prefix. Optional. |
|
Proxy Account 1 |
Yes |
Yes |
An alternative account name to be used with alternative system authentications. For example, the user's Active Directory account needed for Microsoft SSAS authentication, or the user's SAP BW login for onward connection in other single sign-on environments (for example, Azure or Snowflake). Optional. For more information, see Proxy Account Authentication. |
|
Proxy Account 2 |
Yes |
Yes |
A second proxy account. An alternative account name to be used with alternative system authentications. For example, the user's Active Directory account needed for Microsoft SSAS authentication, or the user's SAP BW login for onward connection in other single sign-on environments (for example, Azure or Snowflake). Optional. For more information, see Proxy Account Authentication. |
|
Language |
Yes |
Yes |
The user's default application language. The |
Proxy Account Authentication
The Proxy Account 1 and Proxy Account 2 fields are used when setting up Proxy Account Authentication with some Authentication Providers. For more information, see Single Sign-on via OAuth, SAP BW Setup, and Microsoft Analysis Services Setup.
Provisioned Users
Many authentication providers support user provisioning. If it has been setup and if you added users using the automated provisioning process, your users will all have a Provisioned type:
- Manual: A Manual user was added outside of the automated user provisioning process. Administrators can edit their details in the Users page as needed.
- Fully: A Fully Provisioned user (or just "Fully") was added using the automated user provisioning process. The main details for this type of user can only be updated using the provisioning process. If Administrators want to edit the user details, they need to update the user in the Authentication Provider and run the provisioning process again. Note: This does not affect secondary details.
- Differential: A Differential user is similar to a manual user in that Administrators can edit their details in the Users page as needed. The only difference is that, if the user is deleted from the Authentication Provider, they will also be automatically deleted from Pyramid.
You can "upgrade" a user's provisioned status in this view; changing the user from being Fully provisioned to being Differentially provisioned or Manually provisioned, or from being Differentially provisioned to Manually provisioned. You cannot "downgrade" a user's provisioned status; so the provisioned status cannot be changed at all once it is Manual.
- Click here for more information about setting up automated provisioning jobs